Wednesday, April 20, 2011

No meat? No problem!

I tried a meat-less meal today. I know, I know. Me? Carnivore extraordinaire? Yep. And guess what. IT WAS AWESOME!!! No, really. It was. I found some wonderful produce at the farmer's market today, including delicious spring maui onions, and the best sweet potatoes I've ever had. Here's what I did:

Farmer's Market Lentil Curry

1 cup red lentils
2 small or 1 large sweet potato/yam, cut into 1 1/2-inch pieces
1 spring maui onion (or any spring onion OR mature sweet onion), sliced
2-4 Tbsp curry powder
1 can coconut milk
3 cloves garlic, minced
1/2-inch piece of fresh ginger, minced
1 quart vegetable broth
2 Tbsp honey
Juice of half a lemon, plus more for garnish, if desired
1 jalapeno, partially dried, diced (optional)
Salt to taste
Jasmine rice (optional, for serving)

This recipe may seem to have a lot of ingredients, but it's so simple. All you do is put everything (except the rice) into a pot and bring it to a boil, then simmer about 30 minutes until the lentils are tender. Serve it over jasmine rice with a squirt of lemon juice. I had a jalapeno that had been sitting a while and partially dried (and turned red), so I put that in. I think a fresh one would give a different flavor, but I liked the dried one. It's up to you, really. Just gives it a nice kick!

And Voila!


This one actually deserves a "wow." It was THAT surprisingly good. :)

Monday, April 18, 2011

Gardening Fun - Week 3

Oh my goodness, look what's growing...


Purple Beans!


And soybeans...


And FINALLY my pumpkins...


It seems like it took forever, but they're finally sprouting.


And in the front yard, my corn...


...and carrots...


This is the clump o' seeds that Talon planted, lol...


And my indoor babies are still doing well.

Red onions...


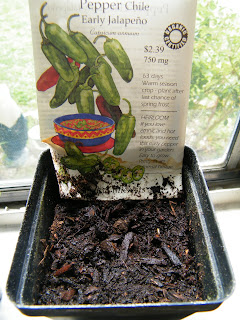
Jalapenos...


and broccoli...I don't know how I'm going to keep the broccoli in the container for three more weeks!


But there it is :) I can't believe I'm making things grow! Stay tuned for next week's updates...

Thursday, April 14, 2011

Hummus - Chip Dip of the Gods

Sorry for the lack of pictures on this one.It was late, and I was tired and hungry. The bottom line is: I made hummus! And it was surprisingly easy. Here's how I did it:

1 can garbanzo beans
1/4-1/2 cup tahini (depending on taste - I like a lot)
4 cloves of garlic
1 tablespoon salt (you can use less - I love salt)
Juice from half a lemon
2 Tbsp. olive oil

Drain the beans, reserving the liquid, and chop the garlic. In a food processor, process all ingredients until smooth and delicious! You can add some of the reserved liquid if it is too thick. Well, that's pretty much it :)

Mommy Makes Milk! - Part Three

Yep,yep, I'm at it again. This time, I've made coconut milk, and it is so easy! You just use dried coconut, so you don't have to mess with the fresh one (not so fun). All you need is:

1 cup dried, unsweetened coconut
4 cups hot water

Empty the coconut into a bowl

and pour 2 cups of hot water over it.

Let it sit about an hour. Reach in and squeeze the coconut shreds a few times to help get out as much "milk" as possible, then put the whole mess into a blender and blend on highest speed for about a minute. Strain through your trusty muslin bag, squeezing to get out all the water. You will be left with coconut shreds.

Now,take that coconut and put it back into the bowl, adding 2 more cups of hot water. You can get even more milk this way. Let it sit a few minutes, squeeze it out, and blend again. Strain it, and add it to the first batch. That's it!

After it gets cold in the fridge some coconut oil will separate out and solidify on the top. You can either spoon it off or just shake it up and drink/use it. It's up to you!

Wednesday, April 13, 2011

As American As...

That's right...Apple Pie! Raw apple pie, that is. No, seriously. Alright, so this one was only KIND OF a success for me. It definitely needs some tinkering. In reality, I ran out of maple syrup, so the end result was lacking a little in the sweetness department, and I'll admit, the coconut in the ice cream, not a great idea. Maybe it's just not to my taste. But aside from those two little snares, this dessert went pretty well. And I have more pictures for this one so you can see the step-by-step process :)

Raw Apple Pie with Maple-Pecan Ice Cream

Ingredients:
For the Pie -
5 granny smith apples
1/2 cup raisins
6 dates, divided
4 tsp. cinnamon, divided
1 tsp. vanilla
1 1/4 cup pecans, divided
1/4 cup cracked wheat
1/2 cup maple syrup
1/2 cup raw honey

For the Ice Cream -
2 cups cashews
1/2 cup maple syrup
1 tsp cinnamon
1/2 cup pecans, chopped
1/4 vanilla bean
2 cups water
1 mature coconut

Equipment:
Food Processor
8"X8" baking pan
8" pie tin

Prep:
Soak cashews in 2 cups water for a few hours. Also soak raisins in 1/2 cup water,and soak cracked wheat in 1/2 cup water.

Drill holes in eyes of coconut and drain out water.

Then, crack coconut open and remove flesh, cutting off brown skin that may adhere to it.


Process coconut flesh in food processor until finely ground, then add reserved coconut water and process until blended and as smooth as possible.

To make ice cream:
Drain cashews and save soaking water. Process cashews in food processor until finely ground and mixture begins to stick together. Add water, maple syrup, and scraped vanilla bean and process until smooth. Add coconut mixture and process to blend. Pour into pan and add chopped pecans. Freeze until firm.


To make pie:
Process 1 cup of pecans and 2 dates until finely ground...

Press into bottom of pie tin.

Process 1 apple, 2 tsp. cinnamon, 3 dates, raisins, along with their soaking water, vanilla, maple syrup, and honey.

Peel. core, and slice remaining apples...

and mix with blended apple mixture...

Pour into pie crust. Process remaining 1/4 cup pecans with 1 date and 1 tsp. cinnamon until finely ground. Mix with soaked cracked wheat and sprinkle over apples. Drizzle with a bit more maple syrup, if desired.

Refrigerate at least 1 hour, preferably longer.

And there you have it!

Delicious raw apple pie with maple-pecan ice cream. Definitely one to write home about :)

Tuesday, April 12, 2011

Mommy Makes Milk! - Part Two

As promised, today's experiment was hemp milk. Hemp milk is supposedly one of the most nutritious for you, so of course, I had to try it. I've had commercial hemp milk before, and I wasn't that impressed. It was really thick and very - hemp-like. I know, duh, right? But it was a little strange to me. Now I must say, the homemade stuff - much better! It wasn't as thick, but still had a nice creamy consistency, and tasted lighter and slightly sweet, even without sweetener. I had a bit of a mishap when, as I was almost done straining it, my muslin bag burst open and I had to start over. The lesson - squeeze gently and have patience. The hemp seeds sort of mash up against the muslin and it takes longer to strain than, say, almond milk with its crumbly pulp that allows liquid to flow right through it.

Another nice thing about hemp milk is there's no need to soak the seeds, so not a lot of prep time :) Here's how I did it:

Hemp Milk

1/2 cup hemp seeds
3 cups water

Equipment:
Blender
Muslin bag for straining
4-cup measuring cup or bowl

Place hemp seeds and water into blender and blend on highest setting for 1-2 minutes, until seeds are finely ground and mixture is well-blended and milky. Put muslin bag into measuring cup or bowl and pour in mixture. Strain by gently squeezing and milking the bag until no liquid remains. You will be left with a mash of hemp seed residue on the inside of the bag, like this:


Yum. Ok, so I just rinsed this away, since I don't know if there's anything I can do with it.

And the result:


Yay! Homemade hemp milk in no time at all! Hemp seeds are not cheap - about $21 a pound - but it cost me only about $2.50 to make 3 cups of hemp milk, so not bad really. Cheaper than buying it, and so much tastier!

Monday, April 11, 2011

Gardening Fun - Week 2

I'm growing things! No, it's not a tumor. It's a garden! Look 8^o

Peppers...(there IS a little shoot there, I promise)


Onions...


And Broccoli!!!


I am pleased :)

Mommy Makes Milk!

I know, I know, it's not news that this mommy makes her own milk for her babies, but I'm talking about a different kind of milk. This week's adventures take us into the realm of non-dairy milk substitutes. That's right - nut milk, seed milk, and what-have-you. So far I've made three different types: Almond Milk, Oat Milk, and Sunflower Seed Milk. Each was its own little adventure, and I'm sure there will be more to come...

So yesterday's task was almond milk. It was surprisingly easy. I soaked the almonds overnight in a jar. Actually, I didn't measure the water. I used a jar that was slightly bigger than 2 cups, filled it about 3/4 full with raw almonds, then filled it to the top with water, and let it sit overnight. By morning, the almonds had swelled to fill the jar and there was very little standing water left. I emptied the almonds into the food processor and added another full jar of water (so a 2:1 ratio of water to almonds). I then processed it, strained it, and was left with about 2 cups of milk, to which I added the same amount (2 cups) of water and put it in a jar in the fridge. Here's the breakdown:

Almond Milk

2 cups raw almonds soaked in three cups of water overnight
4 cups water, divided
Optional: vanilla and sugar/honey/agave/sweetener to taste

Equipment:
Food processor
4-cup measuring cup or bowl
Muslin cloth, bag, or nut milk bag (I used 2 squares of muslin, about 1'X1' each, sewed together on two adjacent sides to make an open bag for straining)

Put soaked almonds, along with any soaking water left, into food processor with 2 cups of water. Process until well-blended. Place bag in bowl/measuring cup and pour in mixture. Gather up the ends of the bag and squeeze out the milk. I like to twist the top closed, leaving some air in the bag, and squeezing the mixture up and down, kind of "milking" it, to speed things along, because I'm impatient like that. Once you've gotten out all the milk (there will be about 2 cups, give or take), add the remaining 2 cups of water to the milk and pour it all into a bottle, adding vanilla and sweetener if you'd like.


See? Simple! Once you're done you'll also end up with a bag full of almond pulp, like this:

I'm still working out what to do with this. I may attempt to dry it out and grind it into almond flour. I'll post all about that if it goes well...


Now for today's experiments: Sunflower Seed Milk and Oat Milk

Sunflower Seed Milk

1 cup sunflower seeds, soaked in 1 1/2 cups of water for 24 hours
4 cups of water. divided

Equipment:
Food processor
4-cup measuring cup or bowl
Muslin cloth, bag, or nut milk bag (I used 2 squares of muslin, about 1'X1' each, sewed together on two adjacent sides to make an open bag for straining)

Put soaked sunflower seeds into food processor along with 2 cups of water and process until smooth. Strain in bag just like for Almond Milk (above) and add remaining 2 cups of water, then bottle.


Again, you'll end up with sunflower seed pulp...


I have no clue what to do with this!

And the Oat Milk...this was an adventure...

So you have to soak the oats for about 24 hours...easy part. The problem was, unlike the nut/seed milk, you should soak it in the full amount of water you will be using for processing, which make for too much water in my food process, apparently, because it leaked everywhere. I had to process it in 2 batches. You could just cut the recipe in half to avoid this problem. Also, DO NOT use muslin to try and strain this! It will just gum up the bag and stick to everything, and the milk will not be able to strain out. Instead, use a mesh strainer, and don't spill half the oat milk all over the counter like I did :)

Oat Milk

1 cup raw oats
4 cups water

Equipment:
Food processor
fine mesh sieve
4-cup measuring cup or bowl

Soak oats in water overnight. Pour oat/water mixture (use half at a time) into food processor and process until well-blended. strain through a fine mesh strainer, stirring the mixture in the strainer to push the milk through, then bottle.


The wonderful thing about making oat milk is that it leaves you with a by-product of AMAZINGLY DELICIOUS raw oatmeal! Check it out:


I added a little maple syrup, vanilla, cinnamon, and raisins. I never thought I would enjoy eating cold oatmeal, but wow, this was incredible :)

So there it is...the first few trials of homemade milk alternatives in the King household. Stay tuned for more as I venture into the world of hemp milk, the wonder-elixer that apparently is the nectar of the health-food gods...

Thursday, April 7, 2011

Raw Spaghetti - Unbelievably Good!

So I know there are tons of recipes out there for raw marinara sauce, but I honestly didn't expect this dish to taste ANYTHING like spaghetti. OMG was I wrong! I cheated and heated it for just a few seconds in the microwave to warm it slightly, because I'm still a little put-off by eating cold spaghetti, but seriously, even cold, it was amazing! I had to have two helpings :)

Raw Spaghetti

3 vine-ripened tomatoes

3 sun dried tomato halves

2-3 Tbsp. olive oil

1 small handful fresh basil leaves

1 small handful fresh parsley

1 date

Juice from ½ lemon

1 clove of garlic

Salt to taste

1 zucchini

Nutritional yeast for garnish (“parmesan cheese sprinkle”)

In food processor, process tomatoes, sun dried tomatoes, olive oil, basil, parsley, date, lemon juice, garlic, and salt until pureed. Slice zucchini lengthwise into 1/8-inch slices, then into 1/8-inch sticks. Top with marinara and sprinkle with nutritional yeast, if desired.


I would have taken a picture, but I ate it so quickly I didn't have time, lol. I was starving! I WILL be making this again, though, so pictures to come!

Lea's Amazingly Raw Carrot Cake

Today was Leonidas's second birthday, so I figured, why not do something out of the ordinary? Why not experiment a little. After all, he's two. He probably won't care if I screw it up anyway, right?

So here it is - tonight's experiment - Raw Carrot Cake. Overall, not bad. A bit of that raw-carrot aftertaste, and really rich, but highly satisfactory :)


Raw Carrot Cake

1 Cup carrot pulp (from juicing 6-8 small carrots)

¼ Cup apple pulp (from juicing 3 small apples)

5 dates

½ Cup raisins

1/3 Cup shredded coconut

1 Cup walnuts

½ Cup almonds

1/3 Cup maple syrup

2 tsp. vanilla

2 tsp. cinnamon

2/3 Cup wheat germ

1 Cup oats

½ Tbsp. coconut oil

Frosting

1 1/2 Cups cashews

¼ Cup water

½ Cup maple syrup

1 tsp. vanilla

¼ Cup shredded coconut

¼ cup coconut butter

Garnish (optional):

Crushed walnuts

Put walnuts and almonds in food processor and process until finely ground, but not yet butter. Add dates and raisins and process to chop and combine. Add carrot and apple pulp, coconut, coconut oil, vanilla, cinnamon, and maple syrup. Process to combine. It may become difficult to process completely at this point, so empty everything into a large mixing bowl. Process oats until finely ground, and add to the mixture along with the wheat germ. Mix with your hands until well combined. Press into a small (6”) cake pan (you could use an 8” or 9” cake pan, but will get a flatter cake) and refrigerate at least 1 hour. Unmold onto serving plate.

For the frosting: Soak coconut in water 15 minutes, then drain. Process cashews in food processor until finely ground and mixture begins to form a ball (i.e., becomes “cashew butter). Add water, vanilla, and maple syrup and process until smooth. Add coconut and coconut butter, and process until lightened in color and texture. Top cake with frosting and garnish with crushed walnuts if desired. Refrigerate before serving.


Voila!


Looks good from here. Let's cut it!

OMG! It looks like carrot cake!

And tastes like it, too...pretty much.

Now who will help me finish it?

Wednesday, April 6, 2011

Raw Dark Chocolate Brownies with Honey-Pecan Icing

Today was a dessert kind of day. Here was my first attempt at raw brownies. It could use a little tweaking - maybe some oats for a bit more chewiness - but overall a success! Here's how I went about it:

Raw Dark Chocolate Brownies with Honey-Pecan Icing

1 Tbsp. coconut oil

2 Tbsp cocoa powder

5 Dates

½ cup walnuts

½ cup pecans

1 tsp. vanilla

¼ cup agave nectar

½ cup wheat germ

Icing:

1 Tbsp. honey

2 Tbsp. coconut oil

½ cup pecans

½ tsp. vanilla

In food processor, process walnuts and pecans to a fine powder. Add dates and process until chopped and blended. Add coconut oil, cocoa powder, vanilla, and agave. Process until well-combined. Stir in wheat germ. Pat into an 8” X 8” pan and refrigerate.

For the icing: Process pecans until the mixture comes together in a ball (makes “pecan butter”). Scrape into a medium mixing bowl and add coconut oil, honey, and vanilla. Mix with a hand-mixer until lightened in color and texture, about 3-5 minutes. Refrigerate until spreading consistency. Spread onto brownies and cut into small squares (these are very rich, so keep them small!).


And here's the final product. Yes, my pieces are uneven a placed haphazardly on the plate, because they just don't care, and are bad-ass like that :)

Monday, April 4, 2011

How does your garden grow...

Hopefully, quite well. I've gotten all my planting done for the Spring, with the help of Leonidas and his cousins, Talon and Persephine. I had to get a little creative with placement, since we don't have a lot of room.

Here is my front yard, where our roses are blooming quite nicely. I had to sneak the hyssop in the back, between them. There are three tiny hyssop plants growing back there, I promise.


This is the unlikely spot for my corn and carrots...


Yes, that little spot right there. Hey, it could work.


So here is the front yard, in all it's potential glory...


And, of course, we had to use up what tiny little space there was in the back yard as well.


I think the clothesline shadow really makes this picture shine, don't you?


Now here is the other side of the yard...complete with the beautiful "weeds" that I will NOT be getting rid of. I like weeds. :)


This will eventually become Cinderella pumpkins, purple beans, and soybeans...


So there it is...my lovely, tornado-just-hit-but-I-still-love-it back yard...my potential future food source!


And let's not forget the broccoli, jalapenos, and red onions which I started inside.


And thus starts my gardening adventure. I DO have some compost that's been composting all year...need to get that over here soon (ahem, Mother, who owns a van with compost-toting capabilities and keeps forgetting to bring it over when she visits...). I just hope I can manage to remember that they're all out there instead of forgetting to water them and letting them die like I usually do. :/